Frequently Asked Questions
General Information (13)
A Mitzvite is a beautiful online Bar, Bat, or B’nai Mitzvah invitation presented by a state-of-the-art cloud based online application.
Mitzvites brings elegance and grace along with next generation internet technology to fill the void for formal online invitations. Elite artist creations set in a high resolution, full screen format has achieved an invitation presentation required for the most formal occasions. With features such as user uploaded video or photography, save the dates, cloud based guest management, and expanded event details, online invitations have finally achieved a level fit for royalty yet accessible to all.
With Mitzvites you can
- Easily create and send online Save the Dates
- Create a Text, Photo or Video invitation
- Add Location Information and Menu Preferences for your Guests to select
- Easily manage your guest list and RSVPs
- Provide an easy-to-use, high-class concierge service for your guests
- And much, much more.
- Provide a refreshing 100% advertising free invitation presentation to your guests. Mitzvites will NEVER feature advertising anywhere.
Yes you can! Mitzvites is free to try so choose a beautiful invitation design, enter your invitation content, upload a photo or a video, enter your guest list, preview your invitation, all for free! We want to make sure you’re 100% happy with your invitation so we do not ask you to pay until you are ready to send your invitations.
Mitzvites is not free for a number of reasons.
- Free invitation sites are not really free. They use your event to make money off of the advertising plastered around your invitation. The more guests you have, the more they make. In our opinion advertising on a Bar or Bat Mitzvah invitation is less than ideal.
- Mitzvites is 100% ad free.
- We do not display advertising banners on your invitations, ever!
Mitzvites is built by people just like you.
- Although, Mitzvites our founders are internet pioneers, they are traditional at heart and understand how important the presentation of a Bar Mitzvah or Bat Mitzvah invitation is. The highest priority was placed on the artistic quality of our invitation design portfolio.
- Mitzvites employs the highest level of software developers and artists to capture the tradition, elegance, personality, and character that capture and embody the true spirit of the Jewish invitation tradition.
- We invite you to compare the quality of our designs against any online invitation service and we are confident that our invitations are a cut above the rest.
- Mitzvites is laser focused and devoted solely to Jewish Bar, Bat and B’Nai Mitzvah’s and nothing else, unlike the other online invitation services.
Yes we can! This is one of the exciting features that sets Mitzvites above all the rest for your online Mitzvah invitation planning.
Our “Additional Events” section gives you the flexibility to add up to four additional events to your invitation. Having a kiddish dinner the night before the big day? No problem! How about a Game Night party for just the kids after the event? Done! Adding multiple events to your invitation is easy and all inclusive with your paid Mitzvites account. No extra charges, no surprises.
Here’s how easy it is to add Additional Events to your Mitzvites invitation.
Start by logging into your Mitzvites account and clicking on the “Event Options” tab. Once there, you will see a tab for “Additional Events“. Simply enter a title and a description for up to four additional events and you can then set whether you’d like to Track RSVPs for each event as well. Once you are finished, click the “Save and Next” button to the lower right.
Now you are on your Guest List page. Easily assign guests to event(s) they are invited to by clicking the “Assign Events” button and clicking the appropriate checkboxes for each event. When this step is done and your invitations are sent, each guest only sees the event(s) they are invited to that you set up in this “Assign Events” section.
Now click “Preview” and you’ll see what your invitation will look like. If you click “RSVP Now” you will see that your main menu contains an “Additional Events” tab that your guests can click on and will feature the information that you entered in the steps above.
Then, click the “RSVP” tab and you’ll see that “Step 2: Additional Events” is now inserted into your invitation so your guests can RSVP for your Additional Events as well! All of the Additional Event RSVP numbers will be tallied in your RSVP Received email and in your online reporting pages so you’ll always be up-to-date and in charge of your event numbers at all times.
No they will not. Mitzvites is a private service and your guests will only see their specific invitation. You (the event creator) are the only one who will have full access to your guest list.
Unfortunately we do not offer phone support. We’re a small company with limited resources, and we’re much better equipped to respond to your questions via this ticketing system and our FAQ page on our website. The folks replying to your questions are the same people who actually built and maintain Mitzvites so we’ll do our best to get you an answer as quickly as we can.
Our invitations never expire. If you are planning ahead and want to start your invitation now and finish it up in a couple of months when your event gets closer, go for it! We will save all of your work and will take you back right where you left off when you log back in again to your Mitzvites account.
And best of all, it’s free to create your invitation! So choose a beautiful invitation design, enter your invitation content, enter your guest list, all for free. You do not need to pay until you are ready to send your invitations.
We sure do! Mitzvites automatically sends out RSVP Reminder emails 7 days before your RSVP Deadline Date and Event Reminder emails 5 days before your event.
Click “Get Started” at the top of any page on the Mitzvites.com website and choose “Create Mitzvite” or “Create Save the Date.”
- Our easy-to-use wizard let’s you move step-by-step through the process at your own pace. You can stop anytime and Mitzvites will save your work and be ready when you are to work again.
Yes you can! The cost is $49 and all you have to do to get started is click here to submit a support request and we’ll get rolling on creating a second invitation for you right away.
Yes. This allows Mitzvites to save your work for you as you create. You can simply do this in one click with the “Sign in with Facebook” button or easily enter your username and password to get started.
This is a scenario that we hear often so we wanted to share with you a solution that other clients of ours are using who are in the same position.
They decided to use Mitzvites for 90% of their guest list to get their Mitzvah invitations out as quickly as possible. For the other 10% who either are a) more traditional or b) do not have email, they sent a traditional paper invitation to them. They saved a lot of money by not having to do a full run of paper invitations and they took care of everyone in their own unique way.
The other way that we can help you is to create a PDF file of your invitation when it is complete and we can email that file to you. Then you can take it to your local print shop to print the number of copies that you need to mail and now all of your guests have the same invitation!
We understand that the idea of sending Bar Mitzvah invitations and Bat Mitzvah invitations online is a new concept to some and we are here to help you solve even the most complex issues you may come up with when sending online Mitzvah invitations.
As an example, a recent client used Mitzvites to manage three different events with three unique guest lists. They were thrilled that we were able to customize a scenario for them that saved time, a lot of money and their sanity.
If you find yourself in this situation, please contact Mitzvites Client Services and we’ll do our best to help in any way we can.
Mitzvites Client Services
Mon – Fri 9am – 5pm PST
Use our simple Contact Form
Mitzvites costs $79 and includes…
- Unlimited Guests
- Unlimited Invites
- Unlimited RSVPs
- Dazzle with Video
- Manage Multiple Events
- Guest Meal Selections
- Supports Hebrew
- Jewish Themed Designs
Invitations - Choose Design (4)
- Click “Bar”, “Bat” or “B’Nai” under the “Mitzvah Type” Header
- Click “Photo”, “Text” or “Video” under the “Invitation Type” Header
- Click “Apply”
- Invitation examples will automatically load based on your preferences.
Just click on the invitation you like and then click the “Save and Next” button to continue to editing your design.
- Click the “Choose Design” navigation button on the left navigation bar of the wizard.
- Navigate to the invitation of your choice and click on that invitation.
- Click “Save and Next” to continue editing of your invitation.
If you’d like to design your own invitation, you are welcome to submit a background image to us and we’ll be happy to put that into an invitation for you. To do so, please follow these steps.
1. The first thing for you to do is browse our invitations and pick a text style from one of them and tell me which one you’ve chosen.
2. Then, attach your background image to this email and send it off to us. I can then place your background image into an invitation with the text style that you like and you’ll now have your own custom invitation to work with.
Required dimensions are 1140px wide by 660px high. Please send your background image in .jpeg or .png format.
We are not available to customize your invitation any further than this so if you’d like to move forward, I would choose an invitation design from our site first where you like the text treatments (and photos or video if you are looking at those invitations) and then design your background. That way you will know where the invitation content is going before you start designing your background.
Invitations - Event Options (5)
Mitzvites is proud to feature some very powerful Event Options that you can easily add to your invitation if you choose. These options are just that, optional, so you can choose to add them or not, the choice is up to you!
The following options are currently available to you and we plan to add more in the near future!
Meal Options
- Now you have the ability to enter your meal choices for your guests and they can select their meal preferences easily when they RSVP. Meal planning just became one less thing to worry about!
Location Info
- Provide personal driving instructions and a photo of your ceremony location to make sure your guests arrive easily and on time.
Additional Events
- Do you have additional events that you would like to invite some or all of your guests to? Need RSVPs for these additional events as well? No problem! Easily enter up to 4 additional events right here using Mitzvites Event Options.
If you would like to skip these options, simply click “Guests” to enter your guest list.
- Click “Event Options” from your Mitzvites account.
- Click on the “Meal Options” tab.
- Simply enter your meal choices into the provided fields. You can be simple with choices like Beef, Fish, Vegetarian, Kids Meal, or get detailed with dish descriptions like Poulet À L’Orange and Kasha Varnishkes.
- Your guests will now be able to select their meal preferences easily when they RSVP.
- Click “Save and Next” from the bottom right or “Guests” from the left navigation to save your changes.
Mitzvites automatically provides a Google Maps link for your guests based on your Ceremony address, but it’s nice to also enter additional driving instructions to make sure your guests can find your location easily.
To do so, click “Event Options” in your Mitzvites account and then click on the “Location Info” tab.
- Enter your “Additional Driving Instructions For Your Guests” by simply clicking in the field and typing in your instructions.
Click “Save and Next” on the bottom right or “Guests” from the left navigation to save your changes.
- Mitzvites saves your work and takes you to the next step.
Start by logging into your Mitzvites account and clicking on the “Event Options” tab. Once there, you will see a tab for “Additional Events“. Simply enter a title and a description for up to four additional events and you can then set whether you’d like to Track RSVPs for each event as well. Once you are finished, click the “Save and Next” button to the lower right.
Now you are on your Guest List page. Easily assign guests to event(s) they are invited to by clicking the “Assign Events” button and clicking the appropriate checkboxes for each event. When this step is done and your invitations are sent, each guest only sees the event(s) they are invited to that you set up in this “Assign Events” section.
Now click “Preview” and you’ll see what your invitation will look like. If you click “RSVP Now” you will see that your main menu contains an “Additional Events” tab that your guests can click on and will feature the information that you entered in the steps above.
Then, click the “RSVP” tab and you’ll see that “Step 2: Additional Events” is now inserted into your invitation so your guests can RSVP for your Additional Events as well! All of the Additional Event RSVP numbers will be tallied in your RSVP Received email and in your online reporting pages so you’ll always be up-to-date and in charge of your event numbers at all times.
Yes we can! This is one of the exciting features that sets Mitzvites above all the rest for your online Mitzvah invitation planning.
Our “Additional Events” section gives you the flexibility to add up to four additional events to your invitation. Having a kiddish dinner the night before the big day? No problem! How about a Game Night party for just the kids after the event? Done! Adding multiple events to your invitation is easy and all inclusive with your paid Mitzvites account. No extra charges, no surprises.
Here’s how easy it is to add Additional Events to your Mitzvites invitation.
Start by logging into your Mitzvites account and clicking on the “Event Options” tab. Once there, you will see a tab for “Additional Events“. Simply enter a title and a description for up to four additional events and you can then set whether you’d like to Track RSVPs for each event as well. Once you are finished, click the “Save and Next” button to the lower right.
Now you are on your Guest List page. Easily assign guests to event(s) they are invited to by clicking the “Assign Events” button and clicking the appropriate checkboxes for each event. When this step is done and your invitations are sent, each guest only sees the event(s) they are invited to that you set up in this “Assign Events” section.
Now click “Preview” and you’ll see what your invitation will look like. If you click “RSVP Now” you will see that your main menu contains an “Additional Events” tab that your guests can click on and will feature the information that you entered in the steps above.
Then, click the “RSVP” tab and you’ll see that “Step 2: Additional Events” is now inserted into your invitation so your guests can RSVP for your Additional Events as well! All of the Additional Event RSVP numbers will be tallied in your RSVP Received email and in your online reporting pages so you’ll always be up-to-date and in charge of your event numbers at all times.
Invitations - Guest List (18)
We are just about ready to roll out new functionality that will allow you to do this on your own, but in the meantime, we are happy to do it for you! Simply click here to create a support request and attach your excel spreadsheet to your request and we’ll be happy to import it for you. We can do it quickly so feel free to continue working on your invitation and we will let you know as soon as your guest are entered. The process only takes two business days or usually less!
- Click the “Gmail” button.
- You will be prompted by Gmail for your username and password
- Mitzvites does not store any of your personal data, this is strictly between you and Gmail.
- Once signed in, you will be presented with your list of Gmail contacts.
- Click the checkbox next to each contact you would like to add to your Guest List and when you are finished, click the “Next” button on the bottom right side of the window.
- You will now see your Gmail contacts in your Mitzvites guest list.
- Click the “Yahoo!” button.
- You will be prompted by Yahoo! for your username and password
- Mitzvites does not store any of your Yahoo! personal data, this is strictly between you and Yahoo!.
- Once signed in, you will be presented with your list of Yahoo! contacts.
- Click the checkbox next to each contact you would like to add to your Guest List and when you are finished, click the “Next” button on the bottom right side of the window.
- You will now see your Yahoo! contacts in your Mitzvites guest list.
- Click the “Outlook” button.
- You will be prompted by Outlook for your username and password
- Mitzvites does not store any of your personal data, this is strictly between you and Outlook.com / MSN / Windows Live.
- Once signed in, you will be presented with your list of Outlook contacts.
- Click the checkbox next to each contact you would like to add to your Guest List and when you are finished, click the “Next” button on the bottom right side of the window.
- You will now see your Outlook contacts in your Mitzvites guest list.
- Click the “AOL” button.
- You will be prompted by AOL for your username and password
- Mitzvites does not store any of your personal data, this is strictly between you and AOL.
- Once signed in, you will be presented with your list of AOL contacts.
- Click the checkbox next to each contact you would like to add to your Guest List and when you are finished, click the “Next” button on the bottom right side of the window.
- You will now see your AOL contacts in your Mitzvites guest list.
Note: You may see a note that says the following when importing contacts from AOL. “Please note that the following application CloudSponge is requesting permission to access your personal information”. We use the service named CloudSponge to easily communicate with AOL. Neither Cloudsponge or Mitzvites stores any of your personal AOL data, we just use this service to help you easily import your AOL contacts.
Start by logging into your Mitzvites account and clicking on the “Event Options” tab. Once there, you will see a tab for “Additional Events“. Simply enter a title and a description for up to four additional events and you can then set whether you’d like to Track RSVPs for each event as well. Once you are finished, click the “Save and Next” button to the lower right.
Now you are on your Guest List page. Easily assign guests to event(s) they are invited to by clicking the “Assign Events” button and clicking the appropriate checkboxes for each event. When this step is done and your invitations are sent, each guest only sees the event(s) they are invited to that you set up in this “Assign Events” section.
Now click “Preview” and you’ll see what your invitation will look like. If you click “RSVP Now” you will see that your main menu contains an “Additional Events” tab that your guests can click on and will feature the information that you entered in the steps above.
Then, click the “RSVP” tab and you’ll see that “Step 2: Additional Events” is now inserted into your invitation so your guests can RSVP for your Additional Events as well! All of the Additional Event RSVP numbers will be tallied in your RSVP Received email and in your online reporting pages so you’ll always be up-to-date and in charge of your event numbers at all times.
Click the “Guest List” navigation button in your Mitzvites Account.
Under the “Enter Guests” header…
- Enter the Primary Guests First Name
- Enter the Primary Guests Last Name
- Enter the Primary Guests Email Address
- Click “Add to Guest List“
- You will now see your added guest on the right side under the “My Guest List” header.
No they will not. Mitzvites is a private service and your guests will only see their specific invitation. You (the event creator) are the only one who will have full access to your guest list.
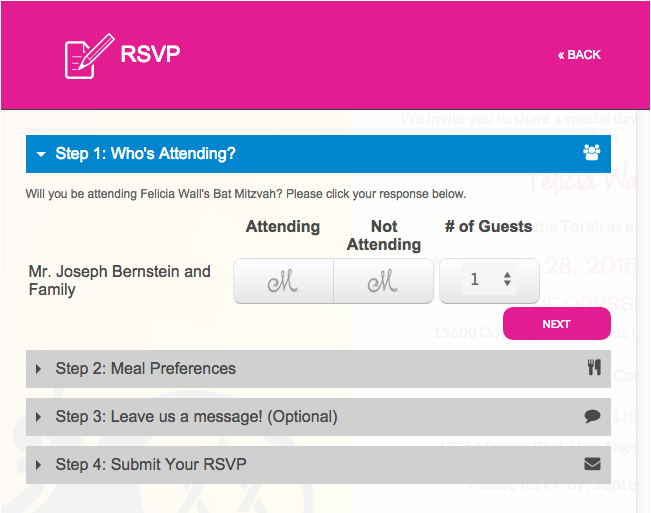
Yes! If you would like to simplify your guest list process and create guest records that look like this…
Mr. Joseph Bernstein and Family
…rather than using our default formal guest list model, we can easily do this for you. Simply contact us and tell us you would like to use our “Simple Guests” model.
Below is an example of what Mr. Joseph Bernstein sees when he RSVP’s to your invitation when you use Simple Guests. Clean and simple.
A Primary Guest is the member of a family or couple that you will send your Invitation to.
After you add your Primary Guest, you can add additional Family Members, Friends and +1’s that your Primary Guest will be able to RSVP for.
Once you have added a Primary Guest to your Guest List, you will see them on the right side under the “My Guest List” header.
- Click “Add Family Member or Friend” and enter the guests Full Name.
- Click “Add Family Member”.
- You will now see the new guest added to the Primary Guest’s name.
- You can add as many Family Members and Friends as you like.
So you want to invite a friend who is dating that new person, but you can’t remember their name and you’re too embarrassed to ask what their name is? No problem! Enter the “+1” button.
- Simply click “+1” to let your guest know that they can bring a friend with them to your event. You can click the +1 button as many times as you like for any Primary Guest.
- Your Primary Guest can RSVP and select meal preferences for their +1 and can easily enter their name as well if they choose.
- Mouse over the guest on the right side that you would like to edit.
- Click “Edit”.
- You may now change any of the Primary Guests information as well as additional guests associated with the Primary Guest.
- Once your changes are made, click “Update Guests” to save your changes.
- Mouse over the guest on the right side that you would like to edit.
- Click “Edit”.
- Click “Remove” next to the “Addl. Members” that you would like to remove.
- Click “Update Guests” to save your changes.
Yes, if a Primary Guest is deleted, all guests associated with that name will be deleted. This change is permanent and cannot be undone so be sure you want to do this before you delete a Primary Guest.
Absolutely! Mitzvites is an all inclusive service so you can add more guests anytime and easily send invitations to just the new guests by using our “Send to Specific Guests” button.
Once you have added your new guests to your guest list, simply click “Send Mitzvite” from the top navigation menu and then click the “Send to Specific Guests” Button. You will be presented with a list of your guests and simply click the checkboxes next to the new guests you want to send an invitation to. Then, scroll down and click the “Send Invitations” button and your Invitations will be on their way.
Be sure to click the “Update Guests” button after you make your changes.
When filling out your guest list, set the “Primary Guest’s” first and last name to the CHILD’s name. The email address that you enter will be the parents email address. When you send your invitations, the email that the parents receive contains a line that says “Invitees:” and next to that heading will be the CHILD’s name, because that’s who you entered as the Primary Guest. As a failsafe, when the parent clicks “View Invitation and RSVP” in that email, they will be taken to your invitation and will see that the only name listed to RSVP for will be their child’s name.
Invitations - Invitation Content (9)
Once you have chosen a design, you will be presented with our Invitation settings window that allows you to fully customize your invitation to your liking. We have provided a template for you that you can modify, or, if you like, you can delete everything that is there and create your own design.
When you have finished editing, click “Save and Next” to save your work. You can always return and make modifications anytime to your work.
Would you like to add your name to the bottom of your invitation? Or maybe add a link to your child’s Mitzvah project right inside your invitation? We think that’s a great idea and here’s how easy it is to do.
From the “Invitation Content” section of your Mitzvites account, click inside any of the text boxes that you currently have. When the edit toolbar opens up at the top, click on the icon that has an “A” and a “+” symbol in it with little lines underneath it. This is the “Insert Text Line” tool. Once you click this, you’ll see a new text box at the bottom of your invitation that says “Edit Text” in it. Remove the words “Edit Text” and type in your desired text. Then, highlight the text and click the “Font” button from the tool bar and choose any font you like. Use the “Size” tool if you’d like the text to be larger or smaller. Easily make this text a link by highlighting your text and clicking the “Link” chain icon from the edit toolbar. It’s fourth from the right on top and says “Add a link” when you roll over it. Enter the website address in the “URL” field and then click “OK” and you’re done!
Be sure to click the purple “Save My Work” disc icon or click the pink “Save and Next” button at the bottom right of your account to save your work. Now click “Preview” to admire your efforts!
- Click “Upload New Photo” button.
- Browse your computer or tablet/smartphone library for your favorite photo and click “Open” or “Done” and your photo will begin uploading automatically.
- Once your photo is uploaded, Mitzvites places an editing tool over the photo for you to resize it to your liking.
- If you are happy with the way the photo looks as is, click “Done”
- If you’d like to edit your photo, simply drag the corners of the edit tool and then move the photo’s position with your mouse or finger to place it exactly where you like it.
- Click “Done” and you will see exactly how your photo will be presented in your invitation.
To remove the black bars from your photo, click “Change Photo” and then click “Edit Your Current Photo“. Then drag the outside corners of the photo sizer box inside the black lines on your photo. When you have the box where you would like, click the blue “Done” button. Be sure to save your work by clicking the purple “Save My Work” disc icon from the toolbar menu or clicking the pink “Save and Next” button on the lower right side of your account. Once you have done this, click “Preview” and your image should be there, just the way you cropped it.
- Click the “Change Photo” button.
- You will see that you can either “Edit My Current Photo”, or “Upload a new Photo”.
- You can also click the X icon if you want to delete a photo entirely and start from scratch.
- Now use the edit tool to resize and position your photo to your liking
- Click “Done”.
- Click “Change Photo”
- Click the X icon in the red circle to the top right of your current photo.
- Click “Upload New Photo”.
- Browse your computer or tablet/smartphone library for your favorite photo and click “Open” or “Done”
- Once your photo is uploaded, Mitzvites places an editing tool over the photo for you to resize it to your liking.
- If you are happy with the way the photo looks as is, click “Done”
- If you’d like to edit your photo, simply drag the corners of the edit tool and then move the photo’s position with your mouse or finger to place it exactly where you like it.
Our invitations never expire. If you are planning ahead and want to start your invitation now and finish it up in a couple of months when your event gets closer, go for it! We will save all of your work and will take you back right where you left off when you log back in again to your Mitzvites account.
And best of all, it’s free to create your invitation! So choose a beautiful invitation design, enter your invitation content, enter your guest list, all for free. You do not need to pay until you are ready to send your invitations.
Yes! We are very proud of our custom Hebrew Keyboard that allows you to enter as much Hebrew as you like into your invitations. Our Orthodox clients have used our new keyboard to great success and we’re looking forward to seeing how you utilize it as well!
To add Hebrew, click “Invitation Content” in your Mitzvites account, then click inside any of the text fields. A text editor will open for you and in the top right corner is the Hebrew letter Aleph (א). Click on that icon and you can enter as much Hebrew as you like. You can use this editor as many times as you like to completely customize your invitation if you’d like.
At any time while you are creating your Mitzvite, you can click “Preview” and a new browser window or tab will open to show you what your actual invitation is going to look like for your guests.
Video Invitation Preview
- If you chose a “Video” invitation, your video will automatically play and at the end, the invitation menu will open for your guests.
- It is here where your guests can replay your video, RSVP, submit Food Preferences and view Additional Driving Instructions and Location Photo if you chose to enter them.
Photo and Text Invitation Previews
- If you chose a “Photo” or “Text” invitation, you will see your full Mitzvite when you click “Preview” and your guests can click “RSVP Now” or the green “Click for Main Menu” tab on the left hand side to open the Invitation Menu.
Invitations - Send Mitzvite (8)
To send your Mitzvite, you will first fill need to fill out our payment form and submit your $79.00 payment. We will process your payment immediately and now you are ready to finalize and send your Mitzvite!
To send a test invitation email to yourself…
- Click “Send Mitzvite” and under the “Let’s test your invitation!” header, enter your email address(es) separated by commas and click the “Send Test Invitation” button.
- Mitzvites will send your invitation with generic content to these email addresses.
- If you do not see your Invitation or Save the Date email in your inbox, please check your spam folder to make sure that it was not filtered by your email client.
- If it was, move the email to your inbox and add “shalom@mitzvites.com” to your address book to ensure you will not miss another email from Mitzvites.
- Mitzvites works tirelessly to make sure our emails are delivered to the inboxes of hundreds of different email services your guests can choose from. It is impossible to guarantee 100% delivery rates so you may have a few guests that have to look in their spam folders to find your invitation.
Simply click on any of the steps you wish to modify from the top navigation. When you are finished, click “Send Mitzvite” and you’ll be ready to send!
We always recommend that when you are ready to send that you add yourself to your guest list and send yourself an actual invitation so you can see the entire process from the guests point of view as well as the host point of view. To do so, add yourself to your Guest List and then click the “Send to Specific Guests” button on the “Send Mitzvite” page. Click the checkbox next to your name and then scroll down and click the green “Send Invitations” button. Once you receive your invitation, view it and then click “RSVP Now” and go through the entire RSVP process. You will then receive an “RSVP Received” email as the host and you will also receive a “Thank You for your RSVP” email as the guest.
When you are happy and fully ready to send…
Click the “Send Mitzvite” link in the top navigation.
To send your Mitzvite to all of your guests at once…
- Click the “Send My Invitation” button
- After you click the button, Mitzvites will process your emails and then… Mazel Tov! Your Mitzvites have just been sent!
- Mitzvites will then send you a confirmation email that your Mitzvite has been sent.
- Now it’s time to sit back and watch your RSVPs come in!
To send your Mitzvite to specific guests only…
- Click the “Send to Specific Guests” button.
- You will be presented with a list of your guests along with checkboxes next to their names.
- Click the checkbox(es) next to the guests that you want to send your Mitzvite to and when you are done, scroll down and click the “Send Invitations” button.
- Mazel Tov! You have just sent your Mitzvite to a specific group of guests.
- Make sure that you are logged into Mitzvites.
- If you are not, click the “Login” button from any Mitzvites.com page and login.
- Click on the “Guest List” button and add or import your new guests.
- When finished, click “Send Mitzvite” from the top navigation.
- Click the “Send to Specific Guests” button.
- You will be presented with a list of your guests along with checkboxes next to their names.
- Notice that the most recent guests you have added are at the top of the list so it’s easy to find your newest guests.
- Click the checkboxes next to the guests that you want to send your Mitzvite to and when you are done, click the “Send Invitations” button.
- Mazel Tov! You have just sent your Mitzvite to a specific group of guests.
Now the real fun begins. Watch your RSVP list grow almost instantly!
As soon as a guest RSVP’s, we’ll send your our custom made “RSVP Received” email. Every time a guest responds, Mitzvites will update your responses, meal preferences and provide you with all the information you need to stay ahead of your event. Who’s coming, who’s not, who hasn’t responded, enjoy guest comments, it’s all there, right in your inbox waiting for you.
Does your event organizer need an updated headcount? Does your caterer need an itemized meal preference list? No problem! Just forward the attached pdf RSVP Report and they are all up-to-date!
Yes! We automatically send out an Event Reminder email to your guests 5 days before your event. We also automatically send out RSVP Reminders 7 days before your RSVP Deadline Date too!
RSVPs (3)
No they will not. Mitzvites is a private service and your guests will only see their specific invitation. You (the event creator) are the only one who will have full access to your guest list.
They go to both! We’ll send you an RSVP Received email each time you receive an RSVP and we also attach a PDF report to these emails that you can forward to caterers, party planers etc. to make sure everyone has your latest RSVP numbers. You can also log into your Mitzvites account at anytime and click on the Pie Chart icon to see your up-to-date statistics as well as bounced email addresses that need to be cleared up and much more.
Yes! You can easily do this right from your Mitzvites.com account. Once you are logged in, click on the “Pie Chart” icon and then click on “RSVP Statistics” on the left side. Click on the “Pending” tab you will see a green “Update” button next to your guest names on the right. Click that button next to the guest(s) that you would like to update and enter their response right there. Your RSVP numbers will update automatically as soon as you click “Done“.
Save the Dates (2)
- Click “Get Started” at the top of any page on the Mitzvites.com website and choose “Create Save the Date.” You will be prompted to create a free account (no credit card required) and then you are set to build your Save the Dates.”
- Our easy-to-use wizard let’s you move step-by-step through the process at your own pace. You can stop anytime and Mitzvites will save your work and be ready when you are to work again.
- You are now presented with the “Enter Event Details” portion of our Save the Date wizard.
- Choose “Bar”, “Bat” or “B’Nai” under the “Choose Mitzvah Type” Header.
- Next, under the “Enter Save the Date Details” header, enter your Mitzvah’s Full Name and your Event Date from the Calendar picker.
- Now enter a Custom Message or additional Event Details (optional) if you choose.
- When you are finished, click “Save and Next” on the bottom right to move on to entering your Mitzvites Guest List.
Yes. This allows Mitzvites to save your work for you as you create your Save the Date. Mitzvites is free to try and you can easily do this by entering your username and password to get started.
Tips and Tricks (2)
To remove the black bars from your photo, click “Change Photo” and then click “Edit Your Current Photo“. Then drag the outside corners of the photo sizer box inside the black lines on your photo. When you have the box where you would like, click the blue “Done” button. Be sure to save your work by clicking the purple “Save My Work” disc icon from the toolbar menu or clicking the pink “Save and Next” button on the lower right side of your account. Once you have done this, click “Preview” and your image should be there, just the way you cropped it.
There are many ways you can approach your video. A few have chosen to hire a professional to create more elaborate videos. Others have experience with video editing and all the video tools and have done some amazing videos as well. The vast majority of videos, including our co-founder’s, were home grown and shot by non professionals. At Mitzvites we tend to prefer the videos that are simple, fun and personal. If you can stick to that rule, your guests will love it.
Some of the best videos we’ve seen are simply Mom or Dad holding a smartphone or a tablet and just videoing their child in one or a few takes. Our Co Founder, Will Bernstein, did just that with his daughter. He filmed her with his tablet, uploaded his video with zero editing and was done. Simple and fun. The guests all loved it and wanted to find out how they could do their invitations the same way. That one simple video spawned Mitzvites.
If you’d like to have a little extra fun with your video, choose the invitation design on Mitzvites before you start. Notice if the event information is on the left or right and where the location of the “RSVP Here” button is. Then, your child can point your guests to where the important information is located on their Mitzvite. By pointing to the Event Information section and showing your guests where to RSVP, your Mitzvite just became a whole lot more personal and informative.
Think simple and your video will be great. If you want to go pro, fantastic, and we can’t wait to see it, but we believe that your child is unique from any other child and letting them express themselves and their personality in a way that makes them feel comfortable on video is what Mitzvites was created for.
When using a Smartphone or Tablet to make your video…
Be sure to turn your phone or tablet SIDEWAYS (landscape) when you are shooting your video. Videos displayed on Mitzvites (or YouTube, Vimeo or any other site for that matter) are designed to be displayed in the widescreen format to maximize the amount of space your subject occupies on the screen. If you hold your phone or tablet vertically, there will be black bars displayed on the left and right side of your video and your subject will not be featured as prominently as they would in landscape mode.
Troubleshooting (4)
Unfortunately we do not offer phone support. We’re a small company with limited resources, and we’re much better equipped to respond to your questions via this ticketing system and our FAQ page on our website. The folks replying to your questions are the same people who actually built and maintain Mitzvites so we’ll do our best to get you an answer as quickly as we can.
To remove the black bars from your photo, click “Change Photo” and then click “Edit Your Current Photo“. Then drag the outside corners of the photo sizer box inside the black lines on your photo. When you have the box where you would like, click the blue “Done” button. Be sure to save your work by clicking the purple “Save My Work” disc icon from the toolbar menu or clicking the pink “Save and Next” button on the lower right side of your account. Once you have done this, click “Preview” and your image should be there, just the way you cropped it.
- If you do not see your Invitation or Save the Date email in your inbox, please check your spam folder to make sure that it was not filtered by your email client.
- If it was, move the email to your inbox and add “shalom@mitzvites.com” to your address book to ensure you will not miss another email from Mitzvites.
- Mitzvites works tirelessly to make sure our emails are delivered to the inboxes of hundreds of different email services your guests can choose from. It is impossible to guarantee 100% delivery rates so you may have a few guests that have to look in their spam folders to find your invitation.
Unfortunately Yahoo! and Outlook have special deals with Facebook that allows them to be one of the very few companies that can import email addresses from Facebook friends, but they are not allowed to export those addresses outside of their system.
- If Facebook ever changes this policy, we will investigate adding this functionality to our roadmap.